Showing posts with label Gifts. Show all posts

Wednesday, March 9, 2011

Psalms Planners

I'vE go two morE plannErs to show you today! I am still working on thEm so should havE morE latEr this wEEk!
I rEally likE how this first onE turnEd out! I found this papEr pad at Ross dEpartmEnt storE of all placEs for only $2.99. It's by Colorbok and callEd WoodhavEn. I lovE thE bluEs and grEEns and can't wait to usE it again. The vErsE was a 12x12 "Faith REmindErs" vEllum shEEt of Psalms. I ran it through a Xyron and adhErEd it to the grEEn papEr from thE samE WoodhavEn pack.

ThE othEr plannEr I havE to show you today usEs a scrapbooking kit I havE had forEvEr and sadly nEvEr usEd. But thE browns and pinks rEmindEd mE of my friEnd PEg and so this onE is hEadEd to Virginia!
ThE kit I usEd is from Fiskar's HEidi GracE ChErrywood LanE collEction. And I usEd thE samE skEtch as thE first plannEr I madE. ThE Psalm comEs from SU "Words of Wisdom" sEt!
I'll havE a fEw morE plannErs and thEn I've got othEr projEcts on my to-do list!
HopE you arE having a GREAT wEEk!!!
~Angel

Monday, March 7, 2011

Planners


HellO! I have mOre planners to shOw yOu tOday!
They may lOOK like a card, but since these are gOing intO a plastic sleeve, they need tO be pretty flat, sO nOt a lOt of embellishments! I am trying tO make mOst Of the planners inspiratiOnal.

This first One was made using Basic Grey's "LemOnade" paper kit and SU's "Delight in Life" stamp. Easy and simple!
Then there is this One made using Melissa Francis paper and a "Starfish and Dreams" vellum INSPIRE sticker. I like hOw they matched so well!
That's abOut all frOm me tOday. It's cOld here and hubby is building me a fire! I am gOing tO gO enjOy it!

Blessings~
Angel

Tuesday, March 1, 2011

A Sketchy Planner


Not only is it sketchy, I think it's kinda scrappy!

I started out with the Jen's February SFYTT.
Yep.... it's a small resemblance only!


The paper is called Washington Apple or something like that. Nice happy colors, don't you think? It's a pocket planner!
I finally got started on some promised handmade gifts.
At the beginning of the year I posted as my Facebook status that the first 5 people to respond and continue the status would get something handmade in the mail from me. I decided to make some pocket/purse planners. And this is my first one!
Guess What?
I have an extra planner and I want to give it away. Comment on this post and let me know your favorite color and you just might get it!
I will draw a winner on Friday 3-4-11.
Thanks for stopping by! Don't forget to leave a comment!
~Angel

Wednesday, February 16, 2011

Valentines

Although Valentine's Day was Monday, I haven't given my TOPS friends their gifts yet due to bad weather conditions last week. And I am going to use that excuse for my post being late as well.
Although I know today is well into the upper 70s and it certainly doesn't feel like winter to me!!
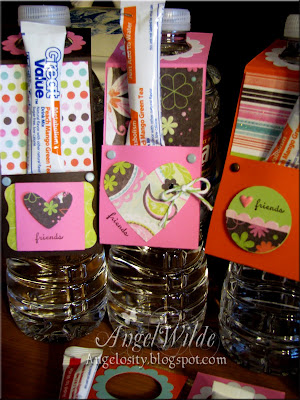
I have made these water bottle pouches before. They are a lot of fun to make and really so simple!
I used a variety of punches and stamps and just had fun.
Each one says "friend", but other than that they are all very different from each other.
Katie helped me and we made 30!The papers that inspired the colors came from a Scrapbook Pad from We R Memory Keepers called "Tiffanys". (Colors are Pixie Pink, Tangerine Tango, Certainly Celery, Cool Caribbean and Early Espresso.) I could not find a tutorial on these and so I may come up with one myself.
They hold a pouch of Crystal Light powder. In my case, I used Great Value brand from WalMart. Less expensive and there are many flavors to choose from!
Here are a couple of close-ups!

Thanks so much for visiting!!!
I hope to have more to show you soon!!
~Angel

Friday, November 12, 2010

Cookie Bouquet


I recently came across a crafting blog that I absolutely adore called "And Then She Made" by a crafting diva named Amy. She has some great ideas and I have already bookmarked several of them.
One of her ideas was this very cute cookie bouquet you can easily use as a Thank You gift. I made one for a neighbor of mine who as been going through a bit of a rough patch. I wanted to give her a little pick-me-up and I also wanted to say thank you for the farm fresh eggs we occasionally receive (and LOVE) from her. The bouquet was pretty simple to make.
The little pots came from JoAnn's fall clearance section. A set of 3 was only $5. I bought a piece of floral foam there as well. I stole the grass from one of my autumn centerpieces, the rub-ons came from my stash and hubby picked up the cookies, spice drops and skewers for me. It was fun, easy and VERY well-received.
On another note, I have been crafting and card making here and there and I have a list of projects I'd love to be working on. But, my back is keeping me from being too productive. I am trying to adjust to a new doctor's plan and so far it's not been a joyful experience. I would appreciate your prayers! And in the mean time I just may be a bit more regular with blogging as the laptop is my friend. And I have photographed several projects over the last few months, just not put them online! You may see more than just paper projects although papercrafting is my first love!
Hope you're having a great day wherever you may be!
~Angel
Comment if you've got the time.
I would love to hear from you!

Friday, February 5, 2010

Journals Part 2

Here are a few more journals! The first journal I made was for Miss Linda (Christine's daughter). Since it was the first, it was modpodged. I added tiny rhinestones to the butterflies.Barbara requested red and the prayer I printed. To stretch the one piece of 12x12 paper (from a Christmas paper stack!) I got a little creative with the back!
The last of the journals was one I made for our Bible study leader. It matches our study guide. I love the font! Veteran Typewriter which I downloaded from DaFont.com!
Have a Blessed Day!
~Angel

Thursday, January 7, 2010

Box of Top Notes

At TOPS we have a special day for each member and it's always a surprise to them. Everyone brings a card and gift. I thought and thought of what to bring and since this member was also a new stamper, I looked around my stamp room asking myself "if I could have one thing as a new stamper what would I like?" And I decided it would be the Top Note die of which I have been in love with since I purchased it. I proceeded to die cut one Top Note die in each of the 48 Stampin Up colors. And when I finished I made a box for them with My Creative Companion.
I think she liked it.

Photobucket

Friday, December 18, 2009

Red Birds on Logs


I recently began subscribing to Martha Stewart's magazine (due to a great offer). My very first magazine to arrive was the Christmas edition. I LOVE it. Full of some practical (and some unpractical) ideas. One of which was these adorable Yule Log Favor Boxes.


They came together pretty easily. The only thing that tripped me up a bit was the nests. Of course, the "log" is an empty toilet paper roll. I painted it brown inside and out. Not really necessary, but I think it gives it a finished look. Then it is covered in the clip art paper found here on Martha's site. I made my nests out of spanish moss instead of buying them as they were kinda pricey to buy as many as I wanted. I used the glue gun to glue it onto the "log" and the bird was glued on as well. A sprig of pine needles cut from a floral pick and tipped in a white paint/glue mix was added. I also touched the log with the white paint and glue and sprinkled glitter to the "snow". I did not add the wood discs to cover the ends as Martha did, but instead filled a cello tube with peppermint candy kisses and tied off the ends with curling ribbon.


For stability I added some twigs to the bottom so the logs wouldn't tip over. It keeps with the woodsy look and was Katie's idea.

After the candy is gone, it will still make a nice decoration. Don't you think?


I gave these to the girls at Bunco who didn't "win" so everyone went home with a prize. We made 6 total. I wanted to make a few more, but Michaels was out of the birds went we stopped by today on the way home from taking Katie to the airport.
Merry Christmas!!!
~Angel

Tuesday, December 1, 2009

Christmas Tag Tin

It's been a few years ago since I happened upon the clearance rack at Claire's and found these empty CD tins. They were only a dime and I got them all. They've been sitting in my alterables cabinet and this week I decided to finally use one.
And after seeing some cool stuff on Splitcoast, I decided to make it into a tin of gift tags. I wanted to add pockets to both sides but because of the way the tin closes, I could only add a pocket to one side. I asked my hubby if he had any ideas for the other side and he mentioned a notepad and pen. I thought it was perfect! The notepad was a little big, but I trimmed it down to fit and added the matching cover. A small piece of ribbon holds the pen in place.
Katie and I made a bunch of different tags out of various stamps and embellishments...10 in all.
I love layering snowflakes almost as much as I love layering flowers! For some reason I've been drawn to the color red for my snowflakes this year. It works!
December is here already. Can you believe it? November was an exciting month for us. It ended with my younger son's engagement announcement! We're going to have a wedding in 2010! I'm so excited. And happy for Brian and Alli (who I happen to adore!) YAY!
Thanks for visiting today.
Blessings~
Angel


Stamps: Joyeux Noel (CHF), Snowflake Circle (Hero Arts)
Paper: Real Red, Basic Black, PTI White, DCWV Holiday Stack DP
Ink: Real Red, Basic Black
Accessories: Martha Stewart Punch Around the Page Aspen Snowflake, Making Memories Shimmer Flourish Chipboard, Standard Circle Small Nesties, Create a Flake, Corner Rounder, Cuttlebug Snowflake Folders,Jewels, Button & Red Floss from Stash
TAGS- too much to mention!

Wednesday, October 7, 2009

A Gift of Hope

A friend of mine recently came over and we made this pink ensemble for her mother-in-law who just began chemotherapy for breast cancer. One of my favorite things about paper crafting is being able to make heartfelt personalized gifts.
Throat Drops~ Purse Tissues~
The gift bag: This little candy box is a repurposed "Laughing Cow" Cheese box!My favorite thing in the package was this keyring photo album made from chipboard coasters and filled with pics of her immediate family members. I hope Kate will be able to keep this with her when she's at treatment giving her a little inspiration.Amy made a stack of ginger cookies for her mother-in-law. Ginger is a natural anti-nausea medicine.Check out the lid:There are lots of pictures as we made several things for her package. And I didn't even take a picture of everything Amy included in the box. There were pink ribbons and tags on almost everything. And Kate absolutely loved the package.
It just so happens that October is Breast Cancer Awareness month. A coincidence really. My friend Peggy is having a little giveaway at her blog to bring awareness to the cause which is near and dear to her heart. Go on over and take a look!
Be sure to check out today's new Product Focus at Splitcoast. It's on the brand new Xyron Creatopia which I used for many aspects of this project.
I hope to be back tomorrow. I've got lots to show and tell!
Blessings!
Angel
Gift project includes:
Stamps~ Tres Chic, Hope Is, Soft Swirls, Polka Dot Punches, happy Harmony (SU) Just Rite Stamper, Motivational Centers (CHF) Crackle Berry (Stampabilties)
Ink~ Regal Rose, Craft White
Paper~ Regal Rose, White, Walk in the Park DP (SU)
Accessories~ Xyron Creatopia- Hearts 3" Borderz, Scallop CUTZ, and Permanent Adhesive; Cuttlebug ribbon diecut, Creative Memories circle cutting system, Scalloped circle punch; Circle punches, Heart punches, modern label punch (SU), white embossing powder, pearls, Daisy punches, various ribbons, Marcella by K & Co embossed stickers

Monday, September 7, 2009

Just Rite Snowflake Gift Bag

I know you don't want to hear this, but Christmas is only 108 days away! If you are anything like me, you wait until the day after Thanksgiving before even starting to prepare. Not this year! I've already got my Christmas cards started and a few other projects ready! And I hope to bring you one holiday project each week until Christmas! More bad news....that's only 16 projects. I'll start with this cute little snowflake bag I made using some of the new "Just Rite" Christmas stamps. If you like personalized projects... these are the stamps for you!
This gift bag started out as a plain white large lunch sack. (I bought these in bulk several years ago and I am still working on that stash.) I cut off the top with Fiskars "Cloud" scissors and added a panel of designer paper to the back and front adhering the ribbon handles under the paper and reinforcing them with a decorative pearl brad.
Having a love of butterflies, this little quote is right up my alley!
The snowflake is a Sizzix die which I've doubled.
These colors go so well together too... Paper Trey Ink's "Aqua Mist" and the retired Baja Breeze from Stampin Up.
I chose to insert a snowflake punch in the center and added a layer of crystal effects with a bit of glitter sprinkled on top. This bag didn't take long at all to put together. I'm hoping to have a few more made in the next 108 days!
I'd better get busy!
See you later!
~Angel

Project Recipe~
Stamps: Merry Little Christmas by Just Rite
Ink: Baja Breeze
Paper: White, Baja Breeze (SU), Aqua Mist (PTI), Figgy Pudding DP by Basic Grey
Accessories: White lunch sack, Aqua Mist 5/8" Grosgrain Ribbon (PTI), Fiskars Cloud Scissors, SU Eyelet Border Punch, Crystal Effects, Dazzling Diamonds Glitter, Sizzix Lg Snowflake Die, Martha Stewart Snowflake punch, Pearl Brads (Paper Studio)

Monday, July 27, 2009

Friends & Flowers

It's Monday and I hope you're having a start to a FABULOUS week!
I've got several projects to share with you this week and time scheduled for more stamping if my MoJo will only find it's way back to my stamp room! (And stay there...LOL)
As many of you know, I belong to a local group called TOPS. These ladies are some of the sweetest women I've ever met. It brings me joy to do little things for them. So, when my aunt gave these little baby food containers to me recently, I knew I had to figure out something to put inside to give my TOPS friends. Candy was my first thought, but since the group is about losing weight, that was not really the best option.
I found some great smelling chunky potpourri at Walmart for only $1 a bag. It's Sweet Pea & Jasmine scented. Mmmmm.

So, I stuffed each container as full as I could with the potpourri and decorated them with various papers, ribbons, punches, flowers and brads. The sentiment "Friends are the Flowers of Life" was perfect for the top.
These 2 containers use those cool Stix2 double sided adhesive sheets and glitters along with my Martha Stewart leaves punch.

Here is a photo showing the potpourri. I think it was just enough to fill a small dish to scent up their bathrooms.
They were thrilled. I'm on the lookout for more little ideas for these gals. They're so sweet.
Anyone have any ideas for me?
That's all for me for now. I'll see you back here tomorrow!
Blessings!
Angel

Project includes the following:
Stamps~ Friends & Flowers (
RSF)
Ink~ Palette Black
Papers~ PTI Sweet Blush, K & Co BW Madeline DP
Other~ Gerber plastic baby food containers, Stix2 Double Sided Adhesive punch sheets, Stix2 pink & green glitters, MS Butterfly Punch, Corner Rounder Punch, Various flower punches, primas and brads,various Ribbons- including Paper Trey Inc ribbons

Tuesday, June 23, 2009

Above My Desk


I moved things around in my stamp room a bit recently. To make room for my new Clip It-Up Ribbon Organizer!!!!! It's so cool to have ribbon right at my fingertips! I know I'll be using it more now.
At first I had the ribbon lengths clipped up right onto the clips, but it left teeth marks in most of the ribbons, so Katie helped me make some ribbon holders out of chipboard. We cut the cardboard into 2" x 4" pieces and used a tag punch to make indentations where the ribbon could be wrapped. It took a little time, but it saved my satin rbbons especially.
Look, there is even a place for my ribbon/fabric scissors!

Do you see my framed name above the Clip it Up? A while back my sweet friend Kelly made this for me! I felt so incredibly loved when it arrived in the mail from Canada! Kelly is incredibly talented. Her expert area of creativity is "art journaling". I wish, wish, wish I had even a little ounce of the artistic ability Kelly has. Her art work is incredible and you can tell it has heart and soul... hers! Thank you again, Kelly!
The difference between try and triumph is just a little UMPH!"
I liked this motivational saying so much I made a little plaque if it to hang above my desk to inspire me!

We enjoyed a long weekend here in the Wilde house. It was great timing since Katie just got home from Kansas. Sporting a new look that I love, I might add!

But... back to life! I've got stamping and crafting projects lined up! Time to get to it!
Thanks for stopping by today!

~Angel